


Zuma 89-11 Hydraulic Drum Brake conversion kit
$ 229.99
Zuma Hydraulic drum conversion kit!
Features :
- Better stopping power
- Better engagement
- No cable stretch
- Improved pull
- More responsive brake
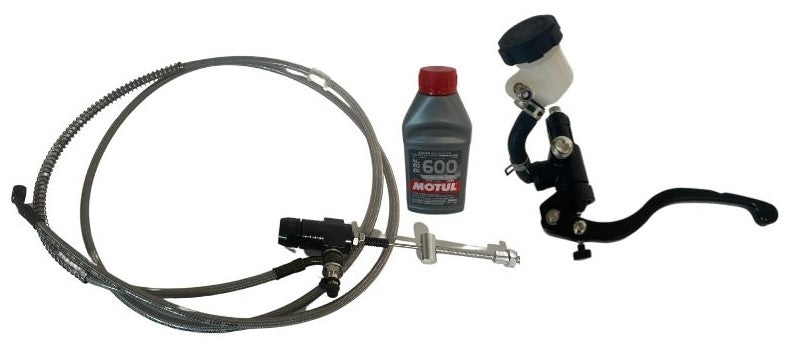
Includes :
- Radial brake master cylinder with banjo and reservoir
- Brake slave cylinder with bleeder banjo, and custom drum brake adapter
- Steel braided brake line
- Motul RBF 600 brake fluid
- Smaller crush washer for gearbox drain (to allow slave cylinder install)
NOTE : Your OEM headset/switch housing may need to be cut to install this kit! Naked bars make the install a lot easier!
ON CERTAIN BIKES, THE GEAR OIL DRAIN TUBE MUST BE SLIGHTLY CLEARANCED TO FIT THE SLAVE CYLINDER, YOU WILL ALSO HAVE TO SWAP THE DRAIN PLUG CRUSH WASHER ON EVERY BIKE.
New brake pads are recommended with the install, OEM works best and they are available here.
VV INSTALLATION INSTRUCTIONS VV
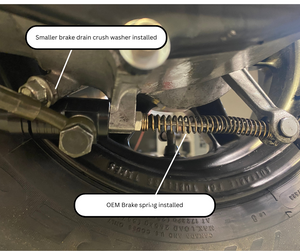
1. Remove original drum brake cable, and lever assembly, please retain the original cable spring, as it will have to be re-used.
2. Remove gearbox drain bolt, and quickly swap the smaller crush washer in.
3. Fit the slave cylinder to the case, with one of the m8x1.25 nuts on the slave, and the other one removed for now, you may notice that the crankcase must be slightly clearanced for fitment. (see photos, be very careful not to punch through the metal into the gearbox drain)
4. install the lever at the handlebars, and run the brake line down through the scooter to the slave cylinder
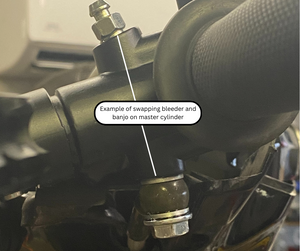
5. Connect the banjo bolts at the master cylinder, and the slave cylinder (you can also swap the bleeder on the master and have it on the top, and put the line/banjo on the bottom)
6. Remove the slave cylinder from the crankcase, be sure to tighten the locking nut holding the brake arm adapter, and make sure to tighten the service/inspection cap on the end.
7. Install the brake spring on to the slave cylinder, along with the barrel, and nut, get it tight enough that there is some tension on the spring. This is very important.
8. Attach the fluid reservoir and bracket to the master cylinder in the desired configuration/orientation. Install a small hose on the bleeder located on the slave cylinder's banjo bolt.
9. Fill the reservoir with fluid, and carefully pump the lever, 20-50 times.
10. holding the lever, crack open the bleeder on the banjo bolt at the slave cylinder, you should see a little bit of fluid come out
Repeat step 9/10 until you see the slave cylinder compress the spring, it should also return when you release the lever
11. Slide the slave cylinder into the crankcase, install the nut onto the slave cylinder, followed by the brake spring, install the barrel into the brake arm, guide the slave cylinder arm through the barrel, once you have the threads sticking out on the opposite side of the barrel, I recommend installing the nut
12. Tighten the 12mm m8x1.25 nut on the slave cylinder, locking it to the crankcase
13. pump the master cylinder up a few more times, cracking it open to see if any air comes out (make sure to keep the slave cylinder full), do the same at the bleeder on the master cylinder to ensure there is no air in the system.
14. Adjust the brake nut and barrel to the desired tension/grab, also adjust the lever to sit where you would like it. You can easily adjust these settings but be sure the wheel spins freely when the brake is disengaged. If you feel the brake is sticking, you may want to clean the brake cam (the part between the pads and what the arm attaches to) and apply some anti seize to it.